Our Raspberry Pi vs Arduino comparison ended with a clear winner for a home NAS: the Raspberry Pi 5. Here’s what to buy, for a simple build and an ambitious one.
How we chose: we did not build these. The list comes from Jeff Geerling’s tested setup and the makers’ documents, linked below. Storage prices are moving quickly, so check before you buy. Price ranges: Budget = under $100, Mid-range = $100-300, Premium = over $300.
Shopping list
| Part | Beginner build | Advanced build | Price range |
|---|---|---|---|
| Raspberry Pi 5 | 4 GB (8 GB for Immich) | 8 GB | Mid-range |
| Power | Official 27 W USB-C supply | 12 V supply, no USB-C | Budget |
| Active Cooler | Yes | Yes, needs a small mod | Budget |
| Storage board | Pimoroni NVMe Base | Radxa Penta SATA HAT | Budget |
| Drives | One 1 TB NVMe SSD | Four SATA SSDs | Mid-range to Premium |
| microSD, 32 GB or more | Unless you boot from the SSD | Yes | Budget |
| Backup drive | Yes, USB | Yes, separate | Varies |
The brain: Raspberry Pi 5
The Raspberry Pi 5 with 4 GB is enough for file sharing. If you want the Immich photo app, choose the 8 GB model, because it needs at least 6 GB. Watch for inflated reseller prices and kits with extras you don’t need.
Power: official 27 W supply
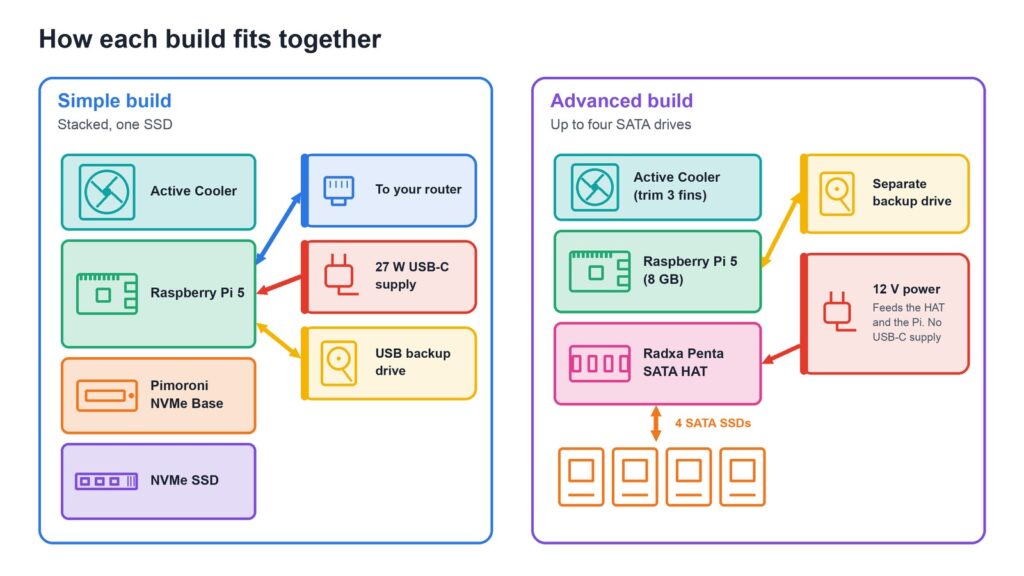
The Raspberry Pi 27 W USB-C power supply is for the beginner build. Check the listing, as other brands use the word “official” too. For the advanced build, don’t buy this: the Radxa board powers the Pi itself from a 12 V supply. Never connect two supplies at once.
Cooling: Active Cooler
An always-on NAS needs a cooler, and the Raspberry Pi Active Cooler is the simple choice. On the advanced build, Geerling had to snap off three fins to clear the Radxa board’s plug.
Beginner storage: Pimoroni NVMe Base
The Pimoroni NVMe Base sits under the Pi and takes SSDs from 2230 to 2280 in length. That matters: Raspberry Pi’s own M.2 HAT+ takes only the shorter 2230 and 2242 drives, and most shop SSDs are 2280.
Beginner drive: WD_BLACK SN770
The WD_BLACK SN770 1 TB is on Pimoroni’s tested list for its dual board. It’s an older model, so stock may fade. Over Gigabit, you won’t feel the difference from a faster drive.
Advanced storage: Radxa Penta SATA HAT
The Radxa Penta SATA HAT connects four SATA drives plus one more through eSATA, and it’s the board behind the best published Pi NAS test. Beware of lookalikes, including one for the Rock Pi 4. You’ll also need a 12 V DC supply with a 5.5 × 2.5 mm plug, centre positive, and we’d choose 60 W. Geerling used four SSDs. We’d avoid big 3.5-inch disks unless you’ve done the power sums, as Radxa allows up to 2.2 A per drive.
Before you start
- Buy the backup drive. A NAS is not a backup, so keep a second copy on a separate drive.
- Avoid SMR hard drives. “WD Red” and “WD Red Plus” aren’t the same: some plain Red models are listed as SMR, a poor match for a NAS.
- Don’t build on an Arduino. Our comparison explains why.
Read next
- Raspberry Pi vs Arduino: which makes the best home NAS?
- What you need to build a Raspberry Pi AI image generator
Show sources (5)
- Radxa’s SATA HAT makes compact Pi 5 NAS – Jeff Geerling, 4 April 2024
- Penta SATA HAT docs – Radxa, consulted 4 November 2026
- M.2 HAT+ – Raspberry Pi, consulted 4 November 2026
- NVMe Base Duo – Pimoroni, consulted 4 November 2026
- Requirements – Immich, consulted 4 November 2026
The week's best tech stories, free
One email a week with the stories that matter, explained simply. No spam.
Disclosure: this article contains affiliate links
If you buy through them, DIGITAL WOXTER TECHNEWS may earn a commission at no extra cost to you. Our picks are based on specifications, prices and published reviews, not on any payments. As an Amazon Associate I earn from qualifying purchases.